Search This Blog

Tuesday, July 31, 2012

How to Get Volume Out of Your Mascara but Without the Clumping!

There seems to be about a bazillion mascaras out there, each making promises to give us whatever it is we desire from our eyelashes, whether it be to increase our lash length 400% or my personal favorite... that it will find lashes that we never even knew existed. In any event, it is a dauting task to find everything that we want all in one tube of mascara! Either it lengthens but it doesn't volumize, it volumizes but it doesn't separate, it separates but it doesn't volumize, etc. We all have our own preferences based on our own individual characteristics of our lashes but in the end. I think that we all want the same thing.. long, thick, and defined lashes. You know, kind of like that girl down below. But without having to apply one inch long false lashes. 


But do you ever notice that volumizing mascaras can often be clumpy? In their attempt to fatten your lashes, volumizing mascaras often disperse a bit too much of the product because well, that extra product around your lashes is what gives them the appearance of more volume. That's all well and good but when your lashes look clumpy, they do not look separated or defined.

How to avoid clumping but still keep the volume:

1. First, apply a coat of a mascara that's job is to separate your lashes so that you are able to take full advantage of every single lash lash (suggestions below). Defining mascaras usually provide good length as well. One thing they don't do the best is create more volume. That's where mascara #2 comes in.

2. After you have a coat or two of a good separating and defining mascara, go over the outer 1/3 of your lashes with a volumizing mascara. In doing so, you keep the definition that you created with mascara #1 but you also get to thicken up those lashes without clumping them together and making them look spiky and less defined. Some people prefer to just over the tips of the lashes with the volumizing mascara and some prefer coating the entire lash, its all trial and error folks.

Mascaras That Will Accomplish This:

For separating and defining, try...

L'Oreal Clean Definition Telescopic, this is a great mascara that finds every lash, lengthens, and defines for perfectly separated long lashes.

Bare Escentuals Flawless Definition, This mascara is very similar to the L'Oreal in that its brush has a ton of spiky little bristels to get in between your lashes to separate them.

To Get More Volume, try.....

L'Oreal Voluminous: You really can't go wrong with this classic mascara staple that is adored by stars like Gwen Stefani. In fact, L'Oreal has had the drugstore mascara market on lock down for quite some time now.

YSL Volume Effect Faux Cils: This is a great mascara but you have to be careful with this one, it is very very wet but perfect for applying to the ends of the lashes without making a mess. A little tip, when it is brand new just blot it with a paper towel before applying. Especially if you want to use it by itself as your only mascara.
To Get Volume & Separation All-In-One, try....

MAC Haute & Naughty: This product is like two mascaras all in one that comes equipped with two different wands, one on each end, one that separates and lengthens (Haute) and one that volumizes (Naughty). The idea is to use either or depending on your mood but you can also use the "Haute" side first then go back over it with the "Naughty" side to create a look that is the best of both worlds which is what we've been trying to achieve all along.  


Monday, July 30, 2012

What's New at Sephora?

I decided to peruse the Sephora website after what seems like an eternity since last purchasing from them. And of course, there are a lot of new things that are tempting me. You do know that the only sure fire way to get rid of temptation is to give into it right? Sounds like a perfectly logical idea to me. I thought I'd share a few of the newest goodies that have caught my eye recently. Do tell if you have tried any of these products and let me know what you think!

Sephora Microsmooth Blush Duo: I hear that this product is fantastic. It's a blush duo that includes a matte satin shade on one side and then a lumizing shade on the other. You can swirl them together or use them separate. They are super duper pigmented, infused with spring water, shaped by hand, and then cooked to perfection. Available in six shades and $17USD.

LORAC Pro Powder Cheek Stain: I love Lorac blushes so I'm guessing these new ones are probably pretty good. The latest blush release from Lorac is infused with antioxidants of vitamins A, C, E and green tea and pomegranate, grape seed, and aloe. Lorac also claims that this blush will last for 12 hours of wear. Available in five shades, $20USD.

NARS Foreplay: How can you talk about amazing blush without the word NARS? Well, actually you can because there are a lot of good ones out there. Nevertheless, the latest release by NARS in the blush category is called Foreplay. This is a palette containing four shades for the face, three blush and one highlighting powder. There are four total squares that vary in size, the largest of which is occupied by the infamous Orgasm blush and the other three are apparently not important enough to earn a name. NARS refers to these shades as a matte peach blush, gold highlighting blush, pink matte blush, and good ole' Orgasm which is peachy-pink with shimmer. I will admit I just think the palette looks really cool but  for $49? Not so sure its worth it. 

Dior Gold Jungle Essentials for Radiant Eyes & Lips: Shut up. This thing is so dang cute I wouldn't even want to use it for fear of lessening the artistic merit of this creation. This is a limited edition palette consisting of some warm toned golden browns, both matte and satin formulas, and a nude gloss. I really don't like lip gloss palettes or lip glosses in palettes because they get all nasty looking and remind me of gloppy gloopy germy tester products at cosmetics counters. And coming as no surprise to me, this limited edition gem will run you $70USD.

Urban Decay Smoked Eyeshadow Palette: The latest palette from UD includes 10 of their newly reformulated shadows in a multitude of shades used to create the ever popular smokey eye. Yes, you get the black and grey tones that are thought of as the more traditional smokey eye colors but there are some really nice modern colors thrown in there too for a little something different. The palette and a mini shadow primer come inside of this little zip up black case which is super cute and will cost you $49USD

Sunday, July 29, 2012

Drugstore Nail Polish Haul: L'Oreal Fall 2012 London Collection

I haven't tried any of the L'Oreal nail polishes but I have been admiring many of their shades for a while now. While in Rite Aid today, there was a L'Oreal display of their new fall London collection which caught my eye. I was drawn right away to "Tea and Crumpets" which is just your basic pale nude-beige color similar to the likes of Essie Topless & Barefoot so of course I snatched that one up. Rite Aid is currently having a Buy 1 Get 1 50% off (not sure if its all of L'Oreal or just polish) so who would pass up that kind of deal? A fool would, that's who. So I looked at the other colors but passed right over "Notting Hill Blues" which just appeared to be a Superman shade of bright blue. I don't particularly fancy blue shades unless its a periwinkle or a really purple-toned blue. But I looked closer and noticed that there was a subtle metallic sheen and what appeared to be some extremely fine microshimmer that is hardly detectable by the human eye.... SOLD! Now, it is my personal opinion that when it comes to metallic blue nail polish, there is a very fine line between "chic" (metallic) and "shitty" (frosty). But in the case of Notting Hill Blues, the color is nothing short of chic. I just hope it looks as good on the nails as it does in the bottle. I will be sure to let you know what I think of these shades if there is anything particularly unique or worth mentioning about them. Otherwise they go in the polish reject drawer where their ultimate fate will be decided.

L'Oreal London Fall Collection. Photo credit, www.stephscloset.com


L'Oreal Tea & Crumpets and Notting Hill Blues. Photo credit http://makeupsessed.blogspot.com


P.S. If you haven't done so already, you have another week to enter my contest to win a cool prize from the MAC Heavenly Creatures collection. Contest is open worldwide. Sign up to follow my blog & click on the picture at the top of the sidebar over there ---------------------------------->
I haven't promoted the contest very heavily so the odds aren't nearly as bad as other contests so you have a good shot!

Look of the Day: A Little Bit Neutral, A Little Bit Glam

Sundays can be rather uneventful, a day of relaxing, maybe a little church action thrown in there, topped off with some Lifetime Movie Network for good measure.. ahhh.. Sundays. I've used today to experiment with some new false lashes, the self-adhesive Ardell 120S that are so easy to put on and work with that I'm a self-adhesive lash convert for life! What I love is that unlike the ones you have to apply glue to, you can move these around on your lash line just in case you didn't quite get the position right but without the mess and bits of glue which can dry on your lashes - a dead giveaway that A. you are wearing false eyelashes and B. you don't know how to put on false eye lashes. Anyway, I've put together a neutral look that can be work or school appropriate if you skip the false lashes but this look can easily be turned into a more date night, evening look with the addition of the false lashes.

Makeup Look of the Day


Products Used!

Face:
Garnier BB Cream in Medium/Dark
Laura Mercier Mineral Powder in Natural Beige
Cle de Peau concealer in Beige
MAC blush in Lovecloud
MAC Superb for highlight
Maybelline Fit Me pressed powder (to set concealer)

Eyes:
NYX eye primer
Urban Decay Virgin (all over)
Urban Decay Snakebite (outer-v)
NYX eyeshadow in Taupe (crease)
L'Oreal Clean Definition Telescopic mascara (bottom lashes)
Ardell Self-Adhesive lashes 120S

Brows:
MakeUpForEver pencil in No. 4
Prestige brow gel

Lips:
Prestige lip liner in Silk
MAC lip liner in Smoke (outer edges of lip)
MAC Plushglass, Fashion Fanatic

Nails:
Revlon Colorstay, Cafe Pink

(Without flash) Revlon Colorstay Cafe Pink (above)

(With Flash) Revlon Colorstay Cafe Pink (above)

Saturday, July 28, 2012

My Favorite Multi-Purpose Eyeshadow & the Usual Overload of Unnecessary Information

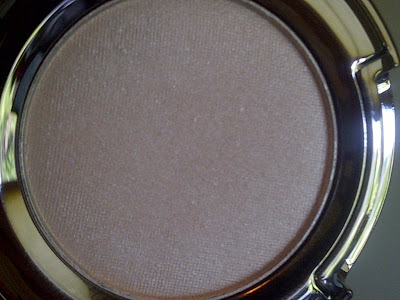
If you have the original Naked palette by Urban Decay, then you already have my favorite, can't life without, eyeshadow that I use every single day of my life. The shade is called Virgin which is described by Urban Decay as a cool beige satin (I think it teeters in between ivory and a very light beige). The texture is creamy and perfect (both the new and old formula) and gives off the most gorgeous and glowy goodness without being over the top.  This particular shade didn't appear too terribly unique upon first glance but I found myself using it more and more until I had done something I RARELY do... I hit pan. I never hit pan. But I have now hit it big time. I just have so many eyeshadows to rotate that I rarely use one or like one so much that I have to buy another when it runs out. I would say that a good 75% of my makeup items are one use away from being kicked to the curb and replaced by something else. But not Virgin, oh no, Virgin is a mainstay.

The only thing I don't like about using the Virgin that I have is that I don't like having to lug around the whole Naked palette just to be able to use it, like for traveling and such. The only other shades I really like and use regularly are Naked and Buck from that palette, with the occasional fling with Dark Horse. Perfect timing for me to buy the single pot form of Virgin because of the whole reformulation thing. The Virgin that I've been using is the old formula so the idea of buying a supposedly improved version of the shadow I love so much, well, that's just one of life's little perks. They may not come that often, so embrace them when they do. 

I headed out to ULTA today with the intent of picking up a Studio Gear lipstick in the shade "Divine" which I have heard very good things about but was told that the newer ULTA stores do not carry Studio Gear. Apparently, Studio Gear isn't hip enough to be sold along side the likes of Too Faced and Urban Decay. Poor Studio Gear. So I did what any good makeup junkie does when a situation presents itself where I can save money and walk away empty handed..... I looked for something else to buy. Hence, Urban Decay Virgin single eyeshadow. Below the pictures, I've listed the ways I use this shadow. And finally, my take on whether the new formula is better than the original UD shadow formula.

Urban Decay Eyeshadow in Virgin. Photo credit  http://makeupsessed.blogspot.com (me!)

Urban Decay Virgin Eyeshadow (no flash!) Photo credit http://makeupsessed.blogspot.com

Urban Decay Virgin (with flash!) http://makeupsessed.blogspot.com

How I use Virgin by Urban Decay:

*Brow bone highlight 
It is perfect for this area because it isn't overly shiny or glowy but still gives a little somethin somethin to brighten up the eye. 

*Inner corner highlight. 
Again, the perfect finish for brightening up the eyes, waking them up (or at least making it look like you are), and adding a little something special to basic eye looks, dramatic eye looks, or no eye looks. Running short on time? Throw a little Virgin in the inner corners and under the brow bone, put on some black winged liner and mascara and you go from blah to BAM! 

*Face highlighter. And you could use this shade as a cheek bone highlight which I have yet to do but when swatching the shade on my hand, I noticed that it would actually be quite perfect for that area. The sky is the limit with Virgin ladies, the sky is the limit. 

*As an all over color. 
I take a dense blending brush like the one from Sigma that is similar to MAC 217, can't think of the name, and I apply it from the lash line to under the brows. The goal is to use other shadows as well but still have Virgin peeking out here and there. I may just apply something like a basic neutral brown (Naked by Urban Decay most often) in the crease area and on the outer portion of my lid and then blend it into the Virgin. This look is simple but pulled together which make it great for an office look, a school look, or a "just running errands but if I see someone I know, I don't want to look like a hot mess" kind of look.  

P.S. Doesn't it always figure that when we run into people that we would never want to look bad in front of, that's the day we opt for no makeup and unwashed hair? You know, like someone that dumped you or a girl that was mean to you in high school? Or even worse, the girl that was mean to you in high school that your boyfriend dumped you for?! The worst part of a situation like this is that you know the chance you will run into that person again when you are looking good is pretty much no chance. Don't let those things happen, be prepared at all times.

New Urban Decay Eyeshadow Formula Better Than the Original?

I would say that the answer will vary depending on the eyeshadow. A few and I do mean just a few of the newer formulated shadows are a bit chalky. Ahem, "Walk of Shame" that the empty palettes come with. But overall, the new shadow formula feels smoother and creamier with the same excellent pigmentation as the originals. I only have two of the new singles but I really love the feel of the new formula. In any event, you can't go wrong with Urban Decay eyeshadow whether its new or old- its just good. 

Friday, July 27, 2012

Makeup Tips for "Hooded" Eyes, Yes You Can Wear Eye Shadow.

If you aren't familiar, the "hooded" eye shape is one where your natural crease is camouflaged by excess skin and it kind of creates the appearance of a hood over your eye lid which also hides the crease area. Some eyes are severely hooded and some aren't so drastic. Hooded eyes naturally happen with advancing age when everything starts to droop but then there are the really lucky ones that get to experience hooded eyes at a much younger age resulting from good old genetics. And for that I say, NOT FAIR! I don't mind growing older gracefully (with a couple of minor tweaks here and there) but I refuse to look older before my time. I do have hooded eyes but I've learned to work with them and not against them by watching a lot of tutorials (I've linked a few of the best ones below) and playing around with different looks.

And by the way, I hate the term "hooded". I even prefer the word "droopy" or "saggy" because "hooded" sounds like a damn disability that should require me to drive around with a handicapped parking sticker in my rear view mirror due to my obscured vision being a a potential safety hazard. And one more thing, hooded isn't the same as mono-lid although they are often lumped together as two unfortunate eye shapes when it comes to tutorials. I would actually rather have a mono-lid because I happen to think Asian girls who have them are gorgeous and look so amazing with just winged liner and whatever eyeshadow just blended slightly above their lash line peeking over all sultry like. However, if you have hooded eyes, nothing peeks over because its all hidden under a slab of skin. OK, now that I've made all of you hoodies want to bury your heads in the sand and give up eye makeup forever, I will share with you some tips that may allow you to embrace what God gave you if you haven't already and see that your eye shape can be quite sexy and mysterious. I will also add videos where necessary so that you have a visual for what I'm trying to say! 

Disclaimer: I am not saying that if you have hooded eyes, you should WANT to hide them or change the appearance of them. I feel that personally this eye shape can be challenging to work with because of the lack of a defined crease and thus, these tips are justa way to do the best with what you've got. Take it as you will. 

MAKEUP TIPS FOR THE HOODED EYE SHAPE

1. According to Pixiwoo on YouTube, you should not use the lightest shades on the lid because it draws attention to that part of the eye which makes your hooded-ness more apparent. Remember, light brings things forward and dark pushes things back (kind of like in contouring and highlighting the face right?). Contrary to popular belief, you should actually use the darker shade on the lash line/lid area and blend upwards. Check out this great video for a simple smokey eye.

Start at the lash line with a darker shade and build upwards to blend it out kind of like the smokey eye technique. So you may want to start with a dark shade such as black for a night time look and plop it on the lid but then take a clean blending brush and blend from the lid upwards. This is all a matter of preference, if you think you look better doing something different, then by all means do it!


2. If you want a day time look, put a light shade in the inner corner and the inner 1/3 part of the lid, but then take a medium-tone shade to apply to the rest of the lid and blend it all the way up to just below the brow bone (leave room for your highlight shade). Then take a darker shade in the same color family as your midtone shade and focus on the outer corner or outer "v" area. This will draw the eye outwards and create more dimension. Take a flat shader brush and put the darker shade on the outer 1/3 of the eye lid and crease area but take it up as far as you need to to be able to see it when you look in the mirror and open your eyes. Blend accordingly. 

3. FALSE LASHES! If you have never tried them, and you have hooded eyes, you are missing out! Big luscious lashes totally hide the hooded eye area and make the eyes look so much wider and more awake. The absolutely beautiful Blake Lively has hooded eyes and almost always has on false lashes. They don't change the eye shape but they really maximize the sexyness of the shape but still hiding the part that we may want hidden. If you are saying no way to false lashes, make sure you at least pile on the mascara and maybe curl them after you have your mascara on so the lashes kind of curl up and over the hood.


4. Thick black liquid liner. If you can still see some of your eyelid (those that aren't severely hooded), a nice thick black line will make it look like you do have a more prominent lid area. Depending on your eye shape, you may be able to wing out that liner and really make your eyes stand out. No eyeshadow necessary! The video below is for hooded eyelids especially.


5. Shape those brows! Make sure your brows are in tip top shape with a lovely arch. Get waxed, get plucked, get threaded, just get something to create an arch to life your eye area. Make sure the brows are filled in if they are sparse and even if you don't want to mess with shadow one day, make sure you still use a little brow bone highlight to make the brow arch stand out and lift the eye area upwards. 


6.  Look in the mirror when you are applying your shadow (duh) but what I mean is, look straight on so that you are able to see which part of the eye is visible when you have your eyes open so that you can put eyeshadow in this location. Its common for girls with hooded eyes to want to place their shadow in the typical places that they see others doing. However, when they open their eyes, they can't see the shadow anymore. This is why its important to look into the mirror straight on when applying the shadow to make sure you can actually see it when your eyes are open. Check out this Lisa Eldridge video that is great for showing where to place the shadow.

7. This last tip is not something I'm recommending that you need to do. It will depend on your own personal feelings about how you look, your age, and your economic situation. However, if you are at least in your 30's or older and you've thought about getting a little Botox, a couple of little injections over the brow area can lift the eye area slightly which can take years off your appearance. It's not a drastic change and it won't change your eye shape, it will just lift and brighten that area.. At least that is what I've heard... ssshhhhh.


Thursday, July 26, 2012

A Fuss-Free Way to Do False Eyelashes!


Have you ever gotten so frustrated with applying false eye lashes that you just gave up and accepted the fact that you were just destined to live a falsie-free existence? When lash-glue is required, this is a common occurrence with women who just don't have the patience to keep practicing with them until they get it right. A while back, Revlon came out with false eyelashes with an option for a self-adhesive application. Basically, no glue required because there is a sticky strip along the false lash that works as your adhesive. So much less messy! For one, you don't have to risk putting too much or not enough glue on the back of the lash, no waiting for the glue to become tacky, no visible dried glue on the lashes that makes you look like an amateur, and even better, no globs of glue stuck to your real eyelashes. But doesn't that sticky strip become un-sticky after a while? Good question. The self-adhesive options come with a back-up strip for re-application so you can get more use out of the lashes. I've tried the Revlon and I've tried the Ardell Self-Adhesive lashes and I have to say I'm a fan of both. A friend of mine even prefers the self-adhesive because she feels the black self-adhesive strip enhances the appearance of the false lashes which you don't get if you buy the same exact style of lashes but without the self-adhesive. 

So if I were you, I would go ahead and try them out, especially if you've never tried lashes before but want to or if you HAVE tried regular lashes and gave up because it was too messy or you just couldn't get the hang of it. For a natural but lengthened look, I recommend the Revlon Self-Adhesive in the "Defining" or "Intensifying" style. If you are looking for more of a bombshell look, try the Ardell Self-Adhesive in the 120S. 


Wednesday, July 18, 2012

Bra's and Bikini Tops for the Busty! Cute Ones DO Exist!

Body by Victoria Demi Bra, Victoria's Secret
Alas! I have found a bra and a bathing suit top that I love. I usually only write about makeup but my latest Victoria's Secret purchases have been the latest stand-out products for me. I ordered a few bra's and a bathing suit top and I can say that the clouds have parted and the sun is shining through. First, a little background. I wear a 34DD which is next to impossible to find unless you order online whether its a bra or a bathing suit top. It is near impossible to find all of the qualities you desire in one bra if you wear a DD or higher and you're thin. In fact, us busty gals are severely underserved when it comes to bras. Victoria's Secret finally got on the ball and starting at least making some swimwear and bra's in bigger sizes but with smaller band width. Is it really that impossible to think that just because you are a 32 or 34 around that you couldn't possibly be any bigger than a D cup? Well apparently 98% of the stores that sell bras think so. I recently took advantage of the VS clearance sale where some of their Body By Victoria bra's were marked down from $45 to $19.99 and if you spend $50, you get free shipping. I was able to snag two of these even though I wanted solid colors, all that was left were some with various prints. I received my shipment and I absolutely love these bra's! The style is just a nice basic underwire demi-bra which means that it covers about 3/4 of the front of the breast area so it gives you a nice shape without suffocating your girls (see photo above). Which brings me to another complaint. Why do bra makers think that just because you are large breasted, you must hate them and want to make them disappear?  I can't stand when my only options are full coverage or ones that flatten or separate the girls rather than push them closer together. They are a pair, they do not want to be separated.  I've never been one to spend much on bra's because I figure they stay hidden and quite frankly, they aren't an exciting purchase. The idea of spending $60 on a bra makes me sick to my stomach actually. So I couldn't pass up the $19.99. Even if you aren't bigger than a D cup, this bra would work for anyone and be amazing. If you want to see if there is anything left in clearance in your size, click here: Victoria's Secret Body by Victoria Demi-Bra


Rio Push-Up Bandeau Victoria's Secret
As if I haven't been blessed enough, VS also carries DD sizes in swimwear. Unfortunately, the smaller D cups like 32 and 34 DD and DDD are always limited so you kind of have to take what you can get as far as styles and colors. I really recommend the Rio Push-Up Twist Bandeau bathing suit top from the Very Sexy line no matter what size you are. I ordered it in the color you see in the photo which is Shimmer Blue Sky and it is a minty blue, to die for. Some colors are marked down but the newer shades like the one I ordered is not. The retail price is $48 for the top which is pricy in my book for a bathing suit top. This style is available in sizes up to DD and it fits amazing! It covers enough so that you're comfortable but not so much that you look like a granny. You can wear this strapless like in the photo or opt to put the straps on. So happy to have found something stylish and pretty rather than have to settle for whatever fits. A couple of years ago when there was even LESS of a selection of bathing suits in my size, I had to actually order from a company in England and wait like a month to get my order and guess what? The top was too small! But I really liked the bottoms so I had to keep it. But thankfully, this year, I won't have to look to foreign countries to make this type of purchase because Victoria's Secret finally wised up and solved all of my ta-ta troubles. If you'd like to see more of this style and others, click here: Victoria's Secret Rio Push-Up Twist Brandeau 


Seriously, ya'll, if you haven't done so already.. .sign up to follow my blog and enter to win some really cool MAC prizes from the Heavenly Creatures Collection. Contest open worldwide! Click Me to Enter!

Sunday, July 15, 2012

Worst Tweezers Ever in the History of Tweezer-dom

There is an Anastasia brow kit that includes three miniature versions of the clear brow gel, highlighting stick, and tweezers. Clear brow gel? Amazing. Highlight Stick? Really good. Tweezers? Painfully awful. Worst. Tweezers. Ever. I forgot how terrible they were until I misplaced by usual non-pain inducing tweezers and had no other choice but to grab the mini tweezers from Anastasia to pluck with. The part of the tweezers used to pluck the hair are like two massively sharp box cutters that have the ability to pierce your skin  when closing in on a hair. If you are lucky enough to grab on to the hair without losing your epidermis, then these tweezers work decently. However, even when I'm careful, I end up plucking more than just my brow hair. This process is terribly time consuming and certainly not the kind of tweezers that you can pluck quickly with one hair after another. You almost have to have a battle plan in place to pluck each individual hair because if you do move with ease, you will likely pinch your skin. Brow plucking, for some, isn't a pleasant activity and for those who are really sensitive to it in the first place, these tweezers only add fuel to the fire. I fancy myself an expert plucker but when I use these tweezers, I feel terribly awkward and amateurish. For those of us that seem to sprout a single dark hair every now and then in areas of the face that are not supposed to have hair, these tweezers may be suitable. For instance, I get this one black hair that sprouts up in the center of my neck for some unearthly reason that I could probably use these tweezers on and go unharmed. But for the purpose of plucking brows, which is the main reason I use tweezers in the first place, these mini tweezers from Anastasia would be better suited for use as a weapon. Ouch!

Goody Double wear: Ponytail Holder & Bracelet All-In-One!

Gone is the time when a ponytail holder was just a ponytail holder. We are now living in a world of extreme multitasking, a place where even the most mundane and simplistic of things can take on an alternate function making it slightly less mundane. Enter the new Goody Double Wear Elastic Bracelets which serve as a hair band and arm accessory all in one. Available in a variety of colors in gold or silver finishes, you would hardly know by looking at them on someone's arm that they are but a mere elastic ponytail holder. They retail for around $5.99 USD depending where you go and I actually think they are a really cool product. I mean, people have been wearing hair ties on their wrists for a long time now simply as a means of functionality if they are ever in need of pulling their hair back. So why shouldn't they be kicked up a notch in their appearance so that they take on more of a bracelet look? Exactly, said Goody. I have just one set of these in black with the gold finish. Each finish is slightly different with two being more of a modern brushed gold and the other being the typical shiny gold. Wear one, two, or all three, they make for great layering pieces with other bracelets, watches, etc because they are simple yet classic but unlike other bracelets, will solve your hair woes in a pinch. 

Photo taken by me, the black + gold

Photo taken by me, the black + gold
If you haven't done so already, SIGN UP to follow my BLOG so that you can enter my contest to win some really cool MAC Heavenly Creatures prizes!! Just click the link below, contest open worldwide with a chance to enter multiple times!! Find out how!

Sunday, July 8, 2012

Face of the Day Using Wet N' Wild Products!

I'm a neutral eye kind of girl but today I was feeling extra summery and thought I'd dig out the Wet N' Wild eight-pan palette in "Blue Had Me at Hello". This is a great palette of soft and pigmented shades with a mixture of teals and blues, blacks, and a shimmery white highlight. These shadows can be used as eyeliners and I find they work best when applied wet if you want to use them this way. I used quite a few drugstore products today, mostly drugstore for eyes and lips actually. Read on for more products used and photos of the finished look.

Face:
Korres Silicone-Free Primer
Garnier BB Cream in Medium/Deep
MAC Studio Finish concealer in NW20
Laura Mercier Mineral Foundation in Natural Beige
Lorac Baked Matte Satin Blush in Exposed
MAC Fix+

Eyes:
Tarte eye primer
Wet N' Wild Blue Had Me at Hello palette (photo below)
Jordana Fabu-liner, black
Milani Liquif'eye Metallic liner in black (waterline only)
Clinique brow pencil 
Prestige brow gel

Lips:
NYX Pale Pink lip liner
Wet N' Wild matte lipstick in 901B


Photo credit www.makeupandbeautyblog.com Wet N' Wild Blue Had Me At Hello

DON'T MISS OUT! SIGN UP TO FOLLOW MY BLOG AND ENTER TO WIN A SOLD OUT LIMITED EDITION PRODUCT FROM THE MAC HEAVENLY CREATURES COLLECTION. CONTEST OPEN WORLDWIDE!~ FIND OUT HOW TO ENTER MULTIPLE TIMES!
CLICK ME TO ENTER!

Looking For a Dead On Dupe for Urban Decay 24/7 Eye Liner Perversion?

Look no further. You can find it at your local CVS and its the Milani Liquif'eye Metallic Eye Liner in Black. Don't let the word "metallic" fool you because it is a matte, creamy, glossy, jet-black with no shimmer, almost identical to Urban Decay 24/7 liner in Perversion. Except for the Milani runs for about $7.99 while its Urban Decay counterpart is $19. Both liners are extremely black, the blackest of all blacks with a glossy finish. I tend to think the Milani is slightly softer and thus may need sharpened more often but other than that, they are so similar! Both glide on so easily, perfect for the waterline, and the staying power will make it a permanent fixture on your face for hours on end. I swatched both liners side by side with just a couple of swipes and it took major manpower to get them off my hand. They both put up an equal fight when trying to remove them with a baby wipe but it can be done with a little extra effort. I could tell no difference in color (photo below). They both go on very glossy and smooth and then after a few seconds, they dry to a very budge-proof finish. If you want to try to smudge them out, work fast! Milani doesn't have even a fraction of the color selection that Urban Decay boasts in their 24/7 line but they do have the basics and that is really all that most of us reach for on a daily basis anyway. 

Milani Liquif'eye Metallic eyeliner shades

Photo taken by me, Urban Decay Perversion 24/7 liner on top & Milani Liquif'eye in black on bottom

DON'T BE LEFT OUT! GO ENTER MY CURRENT GIVEAWAY FOR A LIMITED EDITION SOLD OUT MSF OR BLUSH FROM THE LATEST MAC COLLECTION, HEAVENLY CREATURES! FIND OUT HOW YOU CAN ENTER MULTIPLE TIMES WEEKLY! OPEN TO ALL, WORLDWIDE!

Saturday, July 7, 2012

JULY CONTEST! ENTER TO WIN, PRIZES FROM MAC HEAVENLY CREATURES CLOSED!!

CONTEST NOW CLOSED! WINNER ANNOUNCEMENT SOON!


Hi everyone! Its contest time! Enter to win and you can choose between the MAC Light Year Mineralized Skin Finish (MSF) or MAC Supernova Mineralized Blush (both products are SOLD OUT) from the latest collection, Heavenly Creatures. I will include pictures of both products in this post. I will notify the winner and ask which item of the two you would like. There are two prizes to pick from so that no matter your skin tone, either the blush or MSF will work for you. Please read the instructions on how to enter! It saves so much time and it also ensures that your votes count!~ Contest runs until August 7th 12:00 AM, EST, winner will be chosen via random.org sometime shortly after. CONTEST OPEN WORLDWIDE of course!

Answer this question to enter: What is your all-time favorite blush and/or highlighter?

1. You must be a follower of my blog, please sign up to follow in the right sidebar! I DO check when I pick the winner to see if you are a follower. If not, I pick someone else. 

2. Everyone that follows me can enter once simply by answering the question above. But there are ways you can get additional entries, that is totally optional. Please follow directions below to see how. 

For each week that you tweet my contest, you get an additional entry. So if you tweet twice, you get three total entries! The first entry is a freebie just for answering the question above.

For each week that you link my contest on your Facebook page, you get an additional entry. You must wait at least one week in between tweeting or posting on Facebook.

If you link my contest on your blog, you get an additional entry.

3. VERY IMPORTANT. If you are entering more than once, leave SEPARATE comments. For example, each week you tweet, link the tweet in a separate comment. If you don't do it this way and leave everything in one comment, it will only count as one entry :(

4. If you only want to enter once, that is totally fine! Everything else is just optional! If you tweet and facebook weekly and add my contest to your blog, you can have a total of 10 entries! That's one FB and tweet per week x 4 weeks + the freebie entry + blog link.

PRIZES: CHOOSE EITHER MAC LIGHT YEAR MINERALIZED SKIN FINISH OR MAC SUPERNOVA MINERALIZED BLUSH!

MAC Light Year MSF Photo courtesy of www.allurabeauty.com

MAC Supernova Mineralized Blush


Nails of the Day Ya'll! Maybelline Color Show, Green With Envy

I picked up one of the new polishes from the Maybelline Color Show line after hearing some good things about the shade, Green With Envy, a creamy minty green. I hear these polishes are hit or miss in the quality department but this shade has seemed to be the fan favorite. The color is really pretty but nothing particularly special. Perhaps a bit of shimmer added to the minty green that we've seen over and over this season would have made it stand apart. In any event, the formula goes on nicely and pretty much opaque in two coats. Time will tell as to how it wears. I picked this up at Walgreens for $4.99. There are a variety of shades, some bright fun colors and metallics but also some toned down muted shades including a pretty dove grey. As for colors that are similar, Green With Envy doesn't have the blue that China Glaze For Audrey has, its more like a slightly mintier version of Essie Turquoise and Cacos. Will report back on details of longevity of wear!
Photo taken by me, Maybelline Color Show Green With Envy

Thursday, July 5, 2012

A Review for June's Glossy Box Subscription

If you don't know already, Glossybox is just another monthly subscription service where you receive around five deluxe or regular sample sizes of various items ranging from makeup to hair products and some odds and ends in between. Glossybox was just released in the US in May and I was quite pleased with May's box. I was charged for June's box in the first week of June but unfortunately didn't receive it until today. July 5th. First complaint, don't charge me until you send out the box and try to send it in the same month that I have paid for. Doesn't seem that hard.

In any event, I opened up the box and everything was wet. Not a good sign. It seems that some Ahava body wash had leaked all over everything. Which is no surprise seeing as how the cap wasn't even the least bit screwed on. After I managed to clean everything up and say goodbye to at least half of the body wash, I looked at what other products there were. To sum it up, absolutely nothing wowed me or even remotely sparked my interest. What I received:

-Ahava Velvet Cream wash
-First Aid Beauty Smooth Shave Cream (good size)
-Ofra Eyeshadow in Goldilocks (full size)
-Wella Moisturizing treatment
-a 3-piece sample sized skin care line by Vbeaute
-perfume sample from Perfume Organic called Urban Organic


The run down: 
Overall, everything was fairly boring. The Ofra eyeshadow is a cream eyeshadow which has an applicator similar to a Lancome Juicy Tube. This product had potential because the staying power is fantastic but the color looks like a baby's first poop after ingesting solid foods. The shade is golden but more on the orange side and doesn't appeal to me whatsoever. It may be decent as an eyeshadow base but certainly not something I'd pick out on my own. Swatch picture below, I know it doesn't look that bad but I'm not into it.
Ofra Eyeshadow in Goldilocks above
I find hair care to be terribly boring and thus I yawned at the site of the Wella hair conditioner, a brand I don't use or like anyway. I was equally as disenchanted with the Vbeaute skin care trio. The Ahava Velvet Cream body wash made a bad impression from the start given that half of it was dumped all over the other products creating a wet, sticky, heavily fragranced (despite being for sensitive skin) mess. The perfume, from Perfume Organic, certainly smelled organic.. a little too organic.. like a plant. Who wants to smell like a plant? The only thing I see myself using is the First Aid Beauty shave cream, out of necessity rather than interest in the product. 

The best part of this month's edition of Glossybox? The Glossy Mag, a  small magazine that includes beauty tips and trends and pictures of products that you WISH you had instead of the bottom of the bathroom drawer junk they sent out this month. In the magazine they feature brands like Laura Mercier, Chanel, and NARS, which is confusing because it only reminds you of what you could have spent your $21 a month on.Wouldn't it make more sense for them to talk about how to use the products that they DO send you?

I am fully aware that some boxes are better than others, I just wasn't pleased with the whole lateness of the shipment, the spilled product mess, and the less than stellar products. I went ahead and canceled the subscription because even if I do get even one great product every other month, its just not worth it. I would rather find a subscription service that ONLY sends makeup, no bath & body products, no skin care, no hair products, no food or gum, and absolutely NO toothpaste or similar toiletries. Moving on!