Saturday, July 30, 2011

Nail Talk: Sally Hansen Crackle + Super Cute Punk Nail Tutorial!

Sally Hansen Crackle: 
I'm a little late on the nail crackle wagon because I go through major separation anxiety when I depart from my nude nail look. However, while watching Friday Night Beauty on QVC, I became inspired to try the look when I saw Sephora by OPI crackle polishes. Being that I wanted instant gratification, I picked up the Sally Hansen brand in the black crackle. I immediately tried it when I got home. What a change from the nude nail, let me tell ya. Black crackle polish is to nude polish, what a graffiti covered wall is to a plain white wall. I do like the look but I'd like to try the OPI brand because the SH is kind of hard to apply. It works best if you apply a thick layer but it is difficult to get it right the first time and not miss a spot,because if you have to go back over the nail, its a mess. And I don't even know if you are supposed to use a top coat or if that deviates from the coolness factor, but it pretty much chipped immediately.
Nail art and texture is super hot right now in the beauty world but I just can't get down with the texture thing. I am partial to neutral, shiny, smooth, neat and short nails. I'm not cool enough for full-on crackle. I fancy myself on mixing genres in my fashion lifestyle and I do believe doing a crackle accent nail among the majority being a solid color is more in my comfort zone. I am certainly willing to try the silver and the white crackle polish and plan to do so soon.


These aren't my nails, but this picture gives me great ideas, like I should have purchased the PINK Crackle! Look how cool it looks over the blue and yellow!~ Photo Credit http://heartnat.blogspot.com/2011/05/sally-hansen-crackle-overcoat-in.html

These are not my nails, I couldn't find the actual owner of these nails to give photo credit!! Umm, how amazing do these perfect nails look in this perfect polish?! Catrice is sold overseas somewhere I do know that, please come to the US, Catrice!
Punk Cheetah Nail Tutorial by Sophy Robson: 


A similar style to the tutorial, photo credit:  http://stylebust.com/
I thought I'd include a super cute nail tutorial taken from the Sephora YouTube channel and performed by Sophy Robson, a famous UK nail artist. You will need a black nail polish or nail pen, a bright pink polish, a light pink polish, or feel free to use whatever you'd like to achieve the same look. 


-Ladies, tomorrow is the LAST day to enter the MAC Semi-Precious contest! THREE fabulous prizes for ONE winner! Contest will end at midnight, EST. If you haven't signed up to follow my blog and enter the contest, please see the details in the sidebar. Click the picture under the contest link and find out all about it before it ends!

Sunday, July 24, 2011

Crest Professional Effects 3D White Strips Review: Wowza! Holy White Teeth!

I've been a fan of over the counter teeth whitening devices for a couple of years now. Why? Because they work! I've used the "dentist strength" whitening strips that you can only purchase from a doctor for around $10 more than what the most costly of the Crest strips sell for. I couldn't tell a major difference between the professional strength product and the the Crest Pro Effects 3D White Strips. I can, however, tell a difference between the one I'm reviewing and ones I used to use which are the Crest Advanced Vivid White Strips.The Advanced Vivid are a notch below the Pro-Effects as far as the order of strongest Crest whitening strips. Both products work exceptionally well in a short period of time but with the Pro Effects, the results are kicked up a couple of notches. And kicked up about $10 more in price of course. You didn't think you'd get a better product for the same price right? 

The Crest Pro-Effects strips are the most effective over the counter whitening strips sold by Crest. They are similar to the Advanced Vivid in most every single way but three. 1. The PE have an improved lower strip for more coverage and 2. provide the highest level of whitening from Crest at retail and 3. the price differs by about $10. I do believe both products contain 10% Hydrogen Peroxide which is very high for over the counter whitening. 


The Pro's for the Pro Effects:


Big time concentration of Hydrogen Peroxide, at 10%. The dentist strength product I have tried was only higher by 2%.


The advanced seal technology make the strips very easy to wear because they really grip on to your teeth. The bottom row does slip a little bit but that could be a user error. 


Noticeable results FAST! I can notice how much whiter and brighter my teeth look after only one use. My teeth really take well to whitening strips so I am not sure if this is just me or what. 

You can still drink while wearing the strips. I don't know about you but I can go hours without drinking anything but the minute you tell me I cant drink for 30 minutes, I'm suddenly thirsty and can't bear the thought. 


The Cons of the Pro-Effects:


Price is a major con! I can always find coupons that help a little bit though, that usually take $7 off. I have seen them in my drugstores for $50+ but they are much cheaper to buy online. And even from Ebay. I mean, they are sealed in packets so its easier to trust a seller to buy from. 


Not ideal for those with sensitive teeth and those whose enamel wears away easily. Although they say "enamel safe" I do believe this is a highly subjective subject and varies by the individual. I have sensitive teeth right underneath my gums where my front teeth are and therefor I place the whitening strips below this area. 


Toward the end of the 30 minutes, you can kind of see the peroxide getting gummy and smearing everywhere under the strip. This is normal but not sure how good it is for your gums to be bathed in HP. But that doesn't seem to factor into my decision to keep using them. No pain, no gain! And white teeth are a must at all times.

A Natural Way to a Whiter and Brighter Smile? LEMONS! 
I met a girl at Sephora once, and her teeth were amazing and perfectly white. She said she didn't use any special products but she attributed her white smile to the fact that she puts lemons in everything. This can be a double-edged sword however because applying a lemon directly to your teeth can wear away your enamel. Putting lemons in your drinks, however, is the smart way to go!

**There is still time to enter the fabulous July contest where there are THREE wonderful prizes from the MAC Semi-Precious collection. From now until July 31st at 11:59pm EST, you can enter up to five times depending on various activities that you participate in. Please click to the picture under the information in the sidebar and get started!

Friday, July 22, 2011

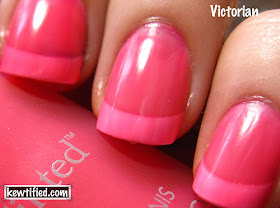
Nail of the Day + Mini Review: Revlon Just Tinted Nail Enamel (Victorian)

It is apparent that lip stains are all the rage with brands like Revlon and Covergirl as well as higher-end brands like Tarte. But a nail stain? Have to admit, that is a brand new concept for this nail polish junkie. Along with their lip stains, Revlon created a line of "Just Tinted" nail polishes that are supposed to provide a sheer wash of color for girls that want something on their nails but don't want to fully commit. While in Walgreen's, I contemplated trying this product and trying to decide which shade to get. The shades are all very pretty, I might add. I ended up with Victorian, a bright, watermelon, pink.


The Finish of the Revlon Just Tinted polish:
Remember when OPI came out with their Matte Suede polishes and they dried to a really flat color with no sheen? It was almost like the texture of a marker that seemed to just melt into your nail and become a part of it rather than something that was put over top of it. The Revlon nail stain mimics the texture and appearance of something like that. Its almost like what happens when you dry your polish in a bowl of ice old water (if you don't do this already, it works to set the polish) and briefly the shine disappears and you are left with with a foggier version of the sheen. Am I confusing you yet? Well one thing I am not confused about is whether I like the look of it. I had ZERO hope for this product, but I gotta say, I like it. And I almost never like gimicky drugstore products, but this one is pretty cool. The Victorian shade does provide a vibrant color after two coats while maintaining the sheerness quality. I wouldn't over-do it with the coats though because I think that detracts from the overall purpose of a "nail tint". If you wanted something opaque, you wouldn't buy a nail tint right?


How Does it Wear?
I am updating this part now that I've had the polish on for a few days. You can't get away with wearing this without a top coat because it will fade right off. It doesn't chip, it fades, which is the oddest thing. But it looks better than chipping! I have zero chipping but the polish starting to wear at the tips which is something that almost immediately happened the day I first put it on. Overall, with a good top coat, its still worth buying. For a nail tint, it wears better than the regular Revlon polish formula, I have to say. But what doesn't?


Shade Selection: 
Very pretty! A great selection of beautiful summery pinks, plums, and I do believe an orange-toned shade as well. I would love to try more, I've got my eye on "Dawn" which is the orange-tone I mentioned. There is a photo of both Victorian and Dawn on someone's nails that are way prettier than mine!


Price: I paid $4.99 at Walgreens today

Photo Credit above, http://sassy-fashionista.blogspot.com/2011/07/revlons-just-tinted-nail-polish.html

Above are my nails after 2 coats without a top coat to show you what the natural finish is, below you can see what a top coat looks like over the nail tint.


Photo Credit: http://www.kewtified.com/2011/06/revlon-just-tinted.html (above and below) Shades Victorian (above) and Dawn (below)

Photo Credit http://www.kewtified.com/2011/06/revlon-just-tinted.html, Just Tinted by Revlon in Dawn + top coat


DON'T FORGET LADIES, THERE ARE 9 MORE DAYS TO ENTER THE JULY CONTEST! THREE FABULOUS PRIZES FROM THE MAC SEMI-PRECIOUS COLLECTION, LINK IS IN THE SIDEBAR! PLUS CHECK OUT MY UPDATED BLOG SALE, LINK ALSO IN THE SIDEBAR!

Thursday, July 21, 2011

Just a Reminder! Check Out My Updated Blog Sale + Make Sure You Enter My July Contest! + Some Haul Info

Hello Ladies!
Just a quick (at least for me) little note to let you know that I've updated my Blog Sale to include some new goodies, like the notorious Cle De Peau concealer in Beige (which is what a light but not porcelain girl would use) and some BNIB MAC Surf Baby stuff. The link is in the sidebar. There is a $10 minimum purchase. 

And there is still time to enter the July MAC Semi-Precious contest. The link is also in the sidebar. There are three fabulous prizes from the Semi-Precious collection valued at over $70! It's as easy as pie to enter, so get to it before July 31st at 11:59PM EST.
Finally, while I've still got the floor, I've picked up a few makeup goodies this past week including that new L'Oreal Le Gloss lipgloss in Baby Blossom, the new stuff that uses Jennifer Lopez in their ads, a Revlon eyeshadow crease brush (yes, Revlon makes makeup brushes), as well as Tan Towels! I know you've seen them around haven't you? The self-tanning wet wipes? Plenty of reviews to follow! 
Let me just tell you though, if you want a really easy, multi-tasking eyeshadow brush, that little $5 Revlon crease brush is a keeper! Its got a short handle, easy to use, dense enough to use as a flat shadow brush for the lid and brow bone but yet fluffy enough for the crease area. I hate when girls say "crease work". "It's really just perfect for crease work!". When you put it that way, it sounds like the task of eye makeup application is much more important than it really is. Seriously, gag me. But its a really great, handy-dandy, little brush! And a perfect brush to take in your purse or on trips instead of packing three or four different brushes. OK, I will sit down now. Thanks so much for reading, and please, sign up to follow me! I will gladly and enthusiastically return the favor if you have a blog as well. Just let me know you've signed up and mention your blog in this post~!

Wednesday, July 20, 2011

Beauty Tip of the Day: A Homeade Lip & Body Scrub

I was inspired to write this post when I was watching Laura Geller on QVC selling her lip scrub for somewhere in the $20+ dollar range. I started to think about some of the pricier lip scrubs that I have seen around town and I thought, how much different can these be from my little at-home lip scrub which does the same thing but using only two ingredients? And two ingredients that are easy to pronounce, familiar to everyone, and found just a few paces away in the kitchen cupboard. You can't mess up, its fool-proof and I promise you end up with the same exfoliated and smooth lips that you would if you used a fancy pants lip scrub that may smell better.

**This can be used as a body scrub but you would obviously need to use more of the ingredients to do this!

1. Take a tablespoon or so of Olive Oil, I use the Extra Virgin, mix it with a couple of tablespoons of sugar. These are not exact measurements. I don't measure anything at all but rather, I dump some sugar in a bowl and pour some EVOO over it. But people like measurements. As long as you have sufficient sugar and enough EVOO to make it moist, you're doing all right.

2. Mix it up using your finger. Rub it all over your lips using circular motions, continue to do so gently. You don't want to scrape your lips off, you just want to get rid of the peelies. You can also rub it into the corners of your mouth onto the skin a little bit where it can tend to get dry. You can't do any harm if you want to exfoliate with it gently around your lips as well. 

3. Wipe it off! You can use the excess mixture on your hands or wherever you have some rough areas. Top it off with a lip balm and you're all set. Cheap. Easy. Effective.

**If you don't have any body scrub, this little homemade mix works just as well. Remember to exfoliate before self-tanning for an even and less streaky and messy around the ankles application!

SEE CONTEST LINK IN THE SIDEBAR! THREE FABULOUS PRIZES FROM THE MAC SEMI-PRECIOUS COLLECTION~ HURRY, GO ENTER!

Sunday, July 17, 2011

N.Y.C. High Definition Volumizing Mascara: So Awesome it Gets a Second Post!

You have to try this mascara. I will preface that statement by saying that I do find that ones views of a certain mascara can be very subjective. Its kind of like recommending a skin care item, we all have different lashes of all densities and lengths and therefor a mascara can react differently according to what we expect or need from it. With that said, I think most anyone will like this N.Y.C. High Definition Volumizing Mascara. Below is a more in depth review that I wrote for it on Makeupalley so I don't have to type it again. As I was searching for more information about it, I found that other bloggers are impressed with this product as well. But you can dig for that information yourself. This review o' mine sums it up. And its $4.99. The one in the orange tube. Let me know what you think when you try it, leave me a comment. This review is for the non-waterproof formula, which has a black brush. I can't attest to the amazingness of the waterproof formula, yet.

My Makeupalley.com Review for N.Y.C. High Definition Volumizing Mascara:

I NEVER would've tried this mascara but I let my daughter pick a mascara for herself at the drugstore and she chose this one. Ugh, that one is gonna be crap, I thought. What a waste of $5! Its probably gonna make my eyes water and turn them bloodshot. Come on girl, pick another one, any other one!! Boy, I was 100% WRONG in my makeup snobbery and negativity. Because it ended up being totally amazing. It separates like nobodies business and adds volume at the same time. Not an easy task! Usually volume can = clumping. The brush is composed of row upon row of a billion little bristles (but I didn't actually count them) which really get in there to separate and define. It mimics the separation quality of the Bare Escentuals Flawless Definition mascara in the way that it really defines, but its much better because it does so much more. Its hard to find volumizing and lengthening as well as amazing definition all in one mascara. ESPECIALLY a volumizing mascara that separates as well as this one. N.Y.C. has proved to me that it can be done. 
I am sorry I didn't have high hopes for this little gem because it truly blew me away and became one of my fave new products. Its around $4.99. I picked up the non-waterproof because I didn't want to have to work hard to get it off of my daughter's eyes. That being said, it doesn't dry near as quickly as a waterproof formula, so you can build and build on the coats. Keep in mind that since the formula is pretty wet, be careful not to build too much. I would wait about 30 seconds in between coats. Because of the wetness, applying too much of it back to back with no wait time can lead to weighing down and clumping up the lashes which will then make it hard to hold the curl. You will find that 2 coats will probably do the trick! I've always been pleased with N.Y.C. blushes and bronzers but never would have thought their mascara would be so good. Its kind of like Wet and Wild, I love their eyeshadows and eyeliners but I'd never try a mascara. Why is that? Oh well, anyway,  I just returned Tarte's Lights Camera Lashes! because the N.Y.C. mascara blows it away and leaves it eating its mascara particle dust.  While I love DS makeup, I'm just not a DS mascara kind of girl. I guess, now I am! Looking forward to trying other mascara formulas from this brand. 


Please see the link in the sidebar regarding my July contest, sign up to follow my blog and have a chance to win THREE MAC products from the new collection. Go on, the link is in the sidebar, what have you got to lose?

Nordstrom Haul: Bobbi Brown + MAC = Good Times!

Not Pictured, MAC Prep and Prime Lip
I've had two gift cards that have been burning a hole in my Louis Vuitton for at least two weeks. Which is an eternity to wait when you have money to spend and you don't have to decide between saving it and doing something useful with it or indulging in guilty pleasures. Gift cards are pretty much guilt free. I did toy with the idea of buying shoes or jewelry (GREAT sales this past Saturday), but in the end, it was makeup that won (again). Usually when I have a gift card, I like to try a new brand that I haven't used before. This time that brand was Bobbi Brown. Nope, never tried a single item from the BB line! I knew I wanted a lipstick because that is always my entry level item when breaking into a new brand. So what all did I choose?

Bobbi Brown Rich Lip Color SPF 12, Bare Pink: Very nice, creamy, opaque lip color with decent staying power. It is creamy and smooth like an Hourglass lipstick (HG) and it wears that way until it wears away. Plus an SPF 12 is amazing and something that I wish all of my lipsticks included. The shade, Bare Pink, is so so similar to my Hourglass Grace which is a beautiful warm nude-pink. Do you ever notice that you keep buying the same color over and over again in different brands? Well, I do. Oh, its odorless which I don't enjoy because I like a sweet (MAC-like) scent to my lipstick. 


From L to R, Bobbi Brown Rich Lip Color SPF 12 Bare Pink, Bobbi Brown Metallic Cream Shadow, Sand Dollar, MAC Plushglass, Nice Buzz
Bobbi Brown Cream Eyeshadow, Sand Dollar: I've heard great things about these and I've been on a cream shadow kick lately because I've been into just wearing a wash of one shade on my eyes to keep it simple. These suckers don't budge. They go on creamy but they set fast and then you will have a hard time blending. I have applied them both with my finger and a brush and I prefer the finger method to get more color pay-off. Sand Dollar is a silvery-taupe, similar to Benefit's Creaseless Cream shadow in "Birthday Suit". What I like about the BB cream shadows is that you can still apply your pencil eyeliner on top of them without the shadow surface being too waxy for the liner to go on smooth and without compromising the color pay-off. You really do not need an eye primer with these because they are your primer + eyeshadow in one. Very practical item that I am glad I added to my collection.


MAC Prep and Prime (Lip): 
I really enjoyed my Too Faced Lip Primer, minus the scent. It really helped my lipsticks grab onto the slightly tacky surface and give great staying power. Ya know when your lip stick is just too slippery and greasy feeling to last very long? The Too Faced primer really helped to increase the longevity. MAC P&P glides on like a lip balm rather than a liquid and while it doesn't give as tacky as a texture, it does help to create a smooth surface for the lipstick to glide on to. I have noticed that it doesn't help lengthen the wear of my lipstick as well as the TF but I do like it and will continue to use it. One plus is that it doesn't have a gross smell that lingers after you've put in on your lips. 


MAC Plushglass, Nice Buzz: 
I really love the Plushglass formula. I used to be a loyal Lipglass girl until I tried the "Big Baby" Plushglass and my loyalty shifted. I really love the scent of the Plush formula, that warm vanilla spice. Although the Plushglasses are sheer, I feel they are thicker and you don't need as much. For those that think the lipglass is too sticky, the Plush may be a good alternative. Unless your lips are overly sensitive to the tingling sensation, which by the way, isn't that overbearing. "Nice Buzz" is a basic sheer and semi-clear gloss with flecks of gold and a hint of champagne color. Its a perfect gloss to wear over most any lipstick because it adds shine and a pretty sheen without changing or over powering the color of your lipstick. One drawback is that they are more $$ than a lipglass, around $19 or so. Either $18.50 or $19.50? See photo above for swatch.


I'd say my Nordstrom Haulage was absolute success. Do you want some new products? How about some new MAC products? How about THREE brand new MAC products like a lipstick, an MSF, and a Mineralize Blush? That you don't have to pay for? See details below!


Win THREE prizes from the new MAC Semi-Precious collection, see link below for instructions! Unnatural Beauty: A Humorous and Opinionated Beauty Blog: July Contest Time! Enter to Win Some New Goodies From MAC Semi-Precious

Friday, July 15, 2011

Tarte Maracuja Oil Concealer: The Mysterious Concealer that No One Can Find!

The Tarte "Glow Your Way to Gorgeous" Kit featuring the creaseless concealer
I have some fantastic concealers (Hourglass, Clea de Peau, Laura Mercier) but they just don't last as a spot cover-up for acne, scars, etc. Even with a powder to set it with! Its very frustrating. I was watching QVC one night during their Friday Night Beauty weekly show when a certain Tarte kit (Glow Your Way to Gorgeous) was being presented. In the kit, along with other popular Tarte goodies, was this concealer that is infused with Maracuja oil. It is said to be a creaseless concealer with all-day kind of staying power. The Maracuja Oil is another natural Tarte ingredient that is new and raved over and is also sold by itself as a moisturizer. The oil gives the concealer this beautiful luminous and brightening effect which looked gorgeous on the model they tested it on. But what was really impressive was the coverage. The model exhibited some serious red cheeks that looked like Rosacia which were instantly fully covered with a couple of dots of the magical Tarte concealer. If I hadn't seen it right before my eyes, I probably would have chalked this product up to another empty promise and unfulfilled claims. But it actually did an amazing job.  The concealer is liquid and comes in a plastic tube which I find a little bit tricky to use for covering small spots. But since my stick concealers aren't doing their job in the area of staying power, I figure why not. So I went to the reviews on MUA, and each of the maybe five reviews just raved over how amazing and wonderful this concealer is. Why aren't there more reviews on this stuff? Well, Tarte isn't exactly making it easy to buy! You see, its only available in a kit put together by QVC which includes their Lights, Camera, Lashes! Mascara, an Amazonian Clay blush, gorgeous cream shadow, and more. The kit runs for somewhere in the $55 dollar range plus shipping of course. Its a fantastic deal for what you get but I only wanted the concealer! Once again I turned to Ebay to help a girl out. Turns out a lot of people are selling this concealer that they received in the kit. I ordered it for around $22 and I can't wait to get it! I will report back when I do. 


***UPDATE***
Received concealer and have used it recently under my eyes but not long enough to tell you if it is creaseless or if the longevity matches the claims, just long enough to show you what it looks like swatched compared to other brands I own. One thing I will say is that it is awesome coverage, its thick and rich but easy to blend, and it blends very easily and smoothly under the eyes. The Maracuja Oil helps to make this possible as well as contributing a luminousity which provides a beautiful brightening effect under the eyes. I think this that the picture I took has captured the sheen nicely. Performance update to follow!
Pardon my bracelet! From L to R: Tarte Maracuja Concealer in Light, Clea de Peau in Beige, Hourglass in Pearl, and Revlon Photo Ready in Light. The shades are all similar and in the "light" family. You can see that the Tarte concealer almost has a luminous finish.

Adding a second photo to show you more of a matte appearance by turning my arm another direction. While the Tarte product can pick up the light and have more of a glow, it also can look like a flat concealer as well.

Wednesday, July 13, 2011

Drugstore Trash and Treasures, a dupe for Bare Escentuals Flawless Def Mascara?

Picked up two things from the DS over the last couple of days. I usually would never opt to buy a mascara from NYC. I like some of their products but a mascara is just something I'm not interested in purchasing from that brand. But my little girl talked me into it and I don't understand why she had such a soft spot for it and I also don't know why I was so easily persuaded. I guess when it involves makeup, you never have to twist my arm.

NYC High Definition Volumizing Mascara: Surprisingly.... good? It reminds me so much of Bare Escentuals Flawless Definition in the way that it separates each lash so well and gives decent length. Flawless Def is one of those safe and easy daytime wear mascaras that you use when you are in a rush and don't have time for clumps and clean-ups. Doesn't do much in the way of volume but an excellent lash separater. Same with the NYC. It goes on a tad wet so I would wait a minute before you do the next coat. Being that I use about 10 coats of mascara, it started to get a bit clumpy after coat 10. You think I'm exaggerating don't you? I'm not. I noticed with each coat that it started to give more volume but with this was the potential risk of clumpage. With that being said, enter that realm at your own risk. Its a very buildable mascara because it doesn't dry quickly like the BE Flawless Def. It doesn't leave your lashes as crispy as BE does when you try to build on your coats after the grace period is up. Overall, for $3.99, its a keeper! Kudos N.Y.C., a score for the little guy!


Revlon Matte Lipstick Nude Attitude: I made the mistake of purchasing this for the second time. I guess I forgot how much I hated it back in 08' when I first bought it. Or maybe it was 09'? The year doesn't really matter except to say that it either sucked for the last two years or it sucked for the last three years. In any event, its not the shade that I hate. I can't hate a nude shade, its against everything I believe in to do so. But the application and the wear is extremely awful to put it mildly. It is so unflattering in the way that it goes on kind of thin but yet cakes up in certain parts of your lips. It magnifies the imperfections like dryness and it wears off in some places and not in others. If you apply more than one coat, the previous coat gets dragged around and you end up with an uneven color distribution and an ugly mess. I despise the way this lipstick goes on! It doesn't go on like a typical matte which is thick and opaque and kind of drying but at least it stays put. NOT AT ALL. It gathers in unwanted places and looks chalky, uneven, un-smooth, and messy. Are all Revlon matte's this bad? This formula needs to be thicker and have more substance to it. It doesn't behave like a matte should, that is for sure. Its more like matte's unruly, behaviorally challenged, and disappointing younger brother. Yuck yuck and more yuck. Thank God for the other Revlon lipstick lines that blow this particular one out of the water. If I were Colorburst I wouldn't even associate myself with Nude Attitude. Feels good to get that off my chest. If anyone wants it, send me a SASE and its yours.

Nude Attitude is first in picture Photo Credit: http://cosmeticsshoesandlife.blogspot.com/2010/09/revlon-matte-lipstick.html

Gorgeous Nude Nail Polish Alert: Deborah Lippmann Naked

For a while now my favorite nude polish has been Essie Topless and Barefoot. I didn't think it could get any better than T&B until I splurged on a Deborah Lippmann nail polish in the shade, Naked. And "naked" it is. Its a much more flesh toned shade than the other nudes I own. Its not as light as T&B yet not as dark as something like Sally Hansen Cafe Au' Lait. Of all my nudes,  Naked is the one that matches closest to my actual skin. Nude polish in a flesh tone does for the hands what nude pumps do for the legs. Elongates them. My fingers are kind of short so for me, this little trick works to help my fingers look longer and more delicate. 
This is my second DL nail polish. With a price tag of $16 for her regular colors and $20 for her glitters, I have been hesitant to add to my collection. But Anne Hathaway wore Naked to this past years Oscar's. Anne has great taste and now, I guess, so do I! 
To get technical about the color description, Naked is a sheer beige that needs 3 coats to be fully appreciated. If you don't own a DL color, her formula applies like a dream. Its creamy without being too thick or messy but yet not as thin and streaky as an Essie polish would be after  two coats in a similar shade. Is it worth $16-$20? I don't think so. While its better than Essie, China Glaze, and Butter London, it stands toe to toe with OPI which is half the price. But she must be doing something right because many A-list celebs trust their nails to Miss Lippmann, whose color range is full of the unique and glittery as well as the trendy and muted. Check out Waking Up in Vegas (pale grey) and Happy Birthday (multi-colored glitter) if you want to try her other famous shades. 

Deborah Lippmann Naked, Photo Credit: http://www.vampyvarnish.com/2011/03/lippmann-collection-spring-2011-collection-swatches-photos-review/

Check out the JULY Contest that is going on RIGHT NOW until July 32st at 11:59pm EST, the link is in the sidebar! Fantastic (THREE) prizes from the MAC Semi-Precious collection! Sign up to follow today!

Saturday, July 9, 2011

Lipstick Disappointment: The NYX Round Ones

Photo Credit: http://lacqueredpaintedpolished.blogspot.com/2011/06/lip-swatch-spam-with-nyx-round.html
I think I am in the minority here because I've heard some rave reviews for the NYX round lipsticks, found at Ulta for around $5.99, and yet I don't really like them. At first I thought it was just the color that I tried that wasn't working for me. I purchased Strawberry Milk some time ago and while I love the shade, I thought the lipstick formula really magnified the dry parts of my lip. But, seeing as how the lipstick only lasted about 2 minutes, those dry patches were not magnified for very long!  

I had forgotten what I didn't like about the round lippies so I picked up another one recently, this time in Pumpkin Pie. Again, another shade that I really like but the shades are not the problem. Same slippery consistency with the lasting power of butter. Even cheap lipsticks have better formulas than the NYX Round do, for example, any of the Wet N' Wild or N.Y.C. lipsticks have far better texture and wearability. The texture of the NYX lipstick is very very similar to that of the Hard Candy (wal mart) lipsticks if you are familiar.

Lipsticks are my favorite makeup product ever and I would be severely unhappy without them. And with brands like Hourglass, MAC, and and even Revlon Colorburst, I can't be bothered with lipsticks that don't wear well on me or for very long. So what DO I look for in a lipstick and how does NYX measure up against my checklist?

My Lipstick Checklist:

-Creamy and semi-thick consitency
-Semi-long wearing, (I don't usually prefer the long wear because a lot of times they are gross on the lips after a while)
-Yummy scent, like MAC or Hourglass
-Beautiful nude shade selection
-Hides lip imperfections rather than put them on blast
-Nice, secure, packaging that you don't worry about when its in your purse

NYX Lipstick VS. MY Lipstick Checklist

-Slightly creamy but too slippery, seems to sit on the top of the lips rather then drench them in moisture
-Very short lifespan on the lips, blink and you might miss it
-No scent
-Nice shade selection, "Pumpkin Pie" is a great nude
-Secure enough packaging


JULY CONTEST DETAILS! GOING ON NOW!
 Don't forget to ENTER my joint-blog contest giveaway below. Follow the link for details and the rules, read carefully please. Some amazing prizes (TWO of them)  from the MAC Semi-Precious collection! What have ya got to lose?

Friday, July 8, 2011

Ulta Haul: Mostly Nail Products + Some New Shoes For Good Measure! Mini-Reviews + PICS included!


So I decided that since I wasn't totally obsessed with Tarte Lights Camera Lashes (although I really did like it, I found that it didn't hold the curl all day), I was going to return it along with the Benefit Creaseless Cream Shadow in Birthday Suit (nice product, great staying power, not the shade I really wanted). So of course I didn't just get a refund, I made an exchange. Plus I spent a little extra. Have you ever gone into Ulta or Sephora and simply taken the refund and walked out without any new products to exchange the returns for? Well, I haven't. 

I picked up OPI Mermaid Tears

from the Pirates of the Carribbean collection, which they were out of the last time I was there. Such a pretty shade! If you like Essie Turquoise and Cacos, China Glaze For Audrey, etc, you will like Mermaid Tears. Its similar but more green and less blue than the two aforementioned shades. 


 Butter London nail polish in Yummy Mummy 
  
What gets me is that you are not only paying $14 as opposed to an OPI price of $8.50, but you get LESS product in a Butter London polish. That's double the rip off! $14 is a lot of pressure to put on a product's performance. That's like saying you can perform twice as good as OPI. Yummy Mummy is a nice taupe- grey like shade with a very very subtle sheen to it that looks nice and makes it a tad more special if you are looking for something non-matte. If you like OPI You Don't Know Jacques, you will like Yummy Mummy. It isn't identical but if you like taupe, you like taupe. It applied pretty nice and fairly creamy, not as streaky as an Essie polish but was almost a too creamy, I had to smooth it out with the brush or else it would have taken forever + a day to dry. The brush is similar to an Essie brush, not thick and perfect like an OPI brush. I think the brush is too skinny for the thickness of the formula.  I just applied it yesterday and so far so good but we'll see how the lasting power measures up. I have an OPI base coat + OPI top coat over it so that is basically like having two bodyguards.

Butter London $14, in shade: Yummy Mummy @ Ulta
OPI Top Coat+Base Coat+Nail Hardener in One: 
This was $12.50 and I like the idea of not having to purchase a separate base coat and top coat so I went for it. I ran out of my top coat so this serves that purpose plus I've been wanting to try a base coat to make sure my nails don't get stained from darker polishes. I like it. It makes my nails shiny and I feel my nails are well protected. Thank you, OPI, for your consistent quality.

OPI Avoplex Cuticle Oil to Go: 
This product is an Allure Beauty Editor's pick. Around $7, this is a cuticle oil full of good ingredients like Vitamin E, Sunflower Oil, Grape Seed Oil, Avocado Oil, and lots more oils.  Would you believe that the Butter London cuticle melt-away is $20?! Basically the Avoplex is simply a moisturizer for your nail area and cuticles, the Avoplex is not used to remove cuticles. What I like about it is that it has a brush and you squeeze the tube to release the oil and then apply it with the brush. I like this application method because you don't need to pour oil into your hands and risk using too much. Overall, a good product but I don't know that it will provide any noticeable results that I couldn't get from my Vitamin E oil that cost much less while providing much more product. But this is a great throw in your purse product for sure!


FREE GIFT WITH $17 OPI PURCHASE!

This is wear I was disappointed. Not because I got a free gift with purchase but because it was, at least at my store, an OPI Base Coat. Grrr. I just spent over $12 on a 3-in-1 product that serves as a base coat when I could have spent $8.50 on a top coat alone and saved $4.  Had I known. Oh well, it was free right? I used it as my base coat before the Butter London and then sealed it with the OPI 3-in-1.


EyLure False Lashes: 
These were Buy 1, Get 1 50% off! They were around $5-$6 to start with and came in a variety of styles. Eylure is said to be the #1 false lash brand in the UK, so I picked up two pairs. I thought I was picking up 2 pairs of the self-adhesive lashes, which I prefer because I always mess up with the lash glue. But instead, I got one of the self-adhesive and one that needs the lash glue. I will live. These are nice, fairly easy to apply but too long for the length required to fit my eye. I had to cut a bit off the end but after that was done, I was happy with the results. I rank them just as good as the Revlon self-adhesive and CHEAPER!

Finally, a non-cosmetic item, SHOES! Cheap ones at that!

 I went to Ross because I heard they had put out some new sandals and things like that. I've had decent luck in the past finding good cheap shoes, under $30. Such as some really cute BCBG nude strappy wedge sandals that I wear to death. I tried on a few pairs and then caught some Nine West heels out of the corner of my eye. Mine. They have around a 1 inch platform for comfort, 4 inch or so heel, a beautiful shade that isn't white but not quite taupe, I want to say its "bone" because I've seen it referred to as such. They have a good sized gold buckle on the left side which I love because it really adds to the shoe. Best of all, I wore them for 4 hours yesterday and my feet didn't kill me! Yay for heels with a platform, they are total lifesavers. Seriously I don't know how I lived pre-platform heel days. The second best thing of all, the price tag, $26.99. 
Nine West heels @ Ross for $26.99


JULY CONTEST DETAILS! GOING ON NOW!

As if this post wasn't long enough right?! Don't forget to ENTER my joint-blog contest giveaway below. Follow the link for details and the rules, read carefully please. Some amazing prizes from the MAC Semi-Precious collection! What have ya got to lose?

Wednesday, July 6, 2011

July Contest Time! Enter to Win MAC Semi-Precious (CONTEST CLOSED)

This is my first JOINT-BLOG contest giveaway so there are some new rules and this time, there are three fantastic prizes. Thank you to Brittany from Miss Brittany Boo for holding the contest with me! The prize theme the MAC Semi-Precious collection. One lucky winner will win both prizes below! Please read the rules carefully, goodluck!

**Contest runs between today and the end of the month, July 31st at 11:59PM EST


**Winner will be chosen in the same way as previous contests, at random, using random.org

Contest Prizes: 

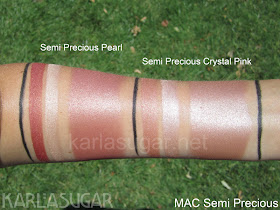
MAC Semi-Precious Mineralize Skin Finish in Semi-Precious Pearl, MAC Mineralize Blush in Warmth of Coral (SEE PHOTOS BELOW!) AND just added thanks to MissBrittanyBoo, the lipstick in Lush Amber!! Fabulous prizes if I do say so myself!!


Answer the following question and leave comment in the original contest post on MakeUpsessed.blogspot.com:  

What is your favorite MAC face product? (i.e. blush, MSF, foundations, powders, highlighters, etc)


1. Must be signed up as a follower of my blog as well as Miss Brittany Boo http://missbrittanyboo.blogspot.com/, this is good for ONE entry. In order to keep things organized, leave your comments (AND your EMAIL) on this original contest post, http://MakeUpsessed.blogspot.com and not on both blogs.

2. We are now giving multiple opportunities to enter the contest, you get one entry for each activity listed below, up to FIVE entries. 

You get ONE entry for each of the following activities, leave a separate comment for each activity that you participate in! If you leave everything in one comment, you will only have one entry. You choose which activities you want to do. If you just want to sign up to follow our blogs and leave one comment for one entry, that's totally fine!

1. Be signed up to follow both blogs, mine http://MakeUpsessed.blogspot.com and http://missbrittanyboo.blogspot.com/

2. Go to my FB page and click "Like"(mine is in sidebar to the right) Leave a comment that says you have done this so I can count it as another entry.

3. Link our contest on YOUR Facebook page, leave a comment with the link separate from your other entries.

4. Link our contest on YOUR own blog's home page, leave another separate comment with the link to your blog.

5. Mention our contest, with the link, on one of your YouTube videos. Leave yet another separate comment with the link to your video.


EXAMPLE: 
Hey, my fave MAC product is their blush (comment #1) and then use a separate comment for each entry!
Hey, here is the link to my FB page where I liked your contest, this is my second entry or comment #2
Hey, here is the link to my blog where I liked your contest! This is my third entry, or comment #3


And so on... and so forth!!

To keep things simple and neat, you only have to leave your comments in the original contest post on http://Makeupsessed.blogspot.com, but you must be subscribed to BOTH blogs to be considered.


http://Makeupsessed.blogspot.com
http://missbrittanyboo.blogspot.com

I will pick the winner via random.org. What I do is get the random number through their random # generator and I count down to the comment that corresponds with that number. That is why its important to leave separate comments for each entry of yours. If you didn't do this, you can go back and fix it, or if you want me to I can delete your entry and you can start over. Whichever is fine with me. 


GORGEOUS PRIZES!

Semi-Precious Pearl MSF (above) Photo Credit: Vampy Varnish, http://www.vampyvarnish.com/2011/06/mac-semi-precious-collection-summer-2011-swatches-photos-review/
MAC Semi-Precious Pearl MSF on the left, photo credit: KarlaSugar.net http://makeupsessed.blogspot.com/2011/07/july-contest-time-enter-to-win-some-new.html

And Just Recently Added... a third prize! (below
Lush Amber Lipstick (above) Photo Credit: http://www.vampyvarnish.com/2011/06/mac-semi-precious-collection-summer-2011-swatches-photos-review/

MAC Warmth of Coral Mineralize Blush

Warmth of Coral (right), Photo Credit: Vampy Varnish http://www.vampyvarnish.com/2011/06/mac-semi-precious-collection-summer-2011-swatches-photos-review/


A Dead on Dupe for Deborah Lippmann "Happy Birthday" Nail Polish!


Milani Gems, Photo Credit: http://nouveaucheap.blogspot.com/2010/12/my-birthday-mani-milani-gems.html

Its perfect timing to find a fantastic dupe for Deborah Lippman Happy Birthday polish because right now Deb is doing her rounds on HSN presenting some of her new nail kits, one of which, includes the super popular multi-colored glitter polish, Happy Birthday. So it was a welcome coincidence that I was at CVS today and came across an exact dupe in Milani "Gems" for around $5. DL glittler polishes run around $20 so you are saving a good $15 for, like I said, an EXACT dupe. I can't speak to the quality similarities between the two as far as formula and lasting power goes but as far as the appearance, Milani Gems is a dead ringer. Right down to the various shapes and sizes of the confetti-like glitter and how much coverage you get with each coat. It's downright scary. Milani must have someone on the inside because they nailed this dupe to a tee! Take into consideration when looking at Milani VS DL, it does matter which polish you wear underneath it to determine how it will look. I tried to find pictures where there wasn't an obvious color like pink or blue underneath the glitter polish because I found that it may cloud the judgment of the similarities between the two.

Deborah Lippman Happy Birthday

The DL Happy Birthday is on the ring finger and the Milani Gems is on the pinky. Can you tell a difference??(Photo Credit: Addicted to all things Pretty, http://addictedtoallthingspretty.com/2010/12/milani-gems-the-deborah-lippmann-happy-birthday-dupe/ )
One difference that I know of is that Milani calls their version, a "one coat" glitter polish. Which means you get the full opaqueness that you seek from a glitter polish after just one coat. Depends what your idea of opaque is because I find that it needs two to do the trick. DL doesn't claim that Happy B-day is one coat polish but the same 2-coat application is necessary for the ultimate bling bling wow factor glitter. It also looks good over so many different colors as a one coat polish, with sporadic glitter distribution and your original color still showing through. I will show you some examples of some great looks I've seen.

Index finger= one coat of DL Happy B-day, Middle Finger= one coat of Milani Gems, Ring Finger= 2 coats of DL HB, Pinky Finger= 2 coats of Milani Gems (Photo credit http://addictedtoallthingspretty.com/2010/12/milani-gems-the-deborah-lippmann-happy-birthday-dupe/)
I am certainly not the first to make this discovery. Reason being, I always thought DL glitter polishes were way too chunky and looked like pieces of foil floating around on your nails. DL calls her glitter polishes more of a grown up way to wear glitter. Personally, I think glitter is glitter and the idea that chunky glitter is more grown up than the typical glitter polish (like an OPI) looks juvenile. DL and the HSN host made mention of this about a thousand times, that this isn't your daughter's glitter polish and it's the adult way to wear it. Which was totally insulting to those 30+ age groups that wear "regular" glitter polish! I say, no matter the age, if you want wear it then wear it! And don't buy into that whole "grown up" vs "your daughter's glitter" polish sales pitch. Lame. Either way, I really do like the DL glitter polishes now that I've tried them. But I'd rather spend $5 over $20 and there is certainly something to be said about accessibility. And getting more CVS bucks for every $50 I spend on beauty items. Thank you, $21 in coupons I used to buy this polish and the Katy Perry Purr perfume, yummy!


Here are some pics that I've found of really cool ways to wear either one of the glitter polishes I've talked about..

Photo Credit: Emery B. http://emeryb.wordpress.com/2011/05/04/mint-comparisons-3/
Photo Credit: Never Unpolished http://www.never-unpolished.com/2011/04/autism-awareness-blue-robyns-birthday.html
Photo Credit: http://www.kelliegonzo.com/2011/02/healing-gems.html
Other Deborah Lippman shades to love (and to try to find cheaper dupes for!)

The way I see it, DL is known for at least three of her polish shades, Happy Birthday is by far the most popular but as far as non-glitter goes, you can't go wrong with Waking Up in Vegas (a very chic grey) and Naked (a beautiful flesh-toned beige). And coincidentally, all three of them are featured in one DL kit on HSN right now! Along with the Ridge Filler, which serves as a great base coat to either fill in those ridges and act as a primer for your polish to follow.

Glitter Nail Polish is HARD to Remove!!! Wanna Know an Easy Way to Get that Crap OFF?!


I wrote a post, called "Homemade Beauty" earlier this year, which talks about a fantastic, tried and true, way to remove glitter polish fast! Spare yourself the scraping, chewing, biting, peeling, and use of weak polish remove to get it off. 

Unnatural Beauty: A Humorous and Opinionated Beauty Blog: Homemade Beauty: My Favorite At-Home Tips and Tricks!